
Introduction
Certainly! If you have a Zoho Mail account and want to improve email deliverability for your WordPress site, you can leverage Zoho's API. By connecting your Zoho Mail account to your WordPress site using W GOSMTP, you can ensure that your site's emails are reliably delivered.
This tutorial will guide you through the process of setting up GoSMTP with your Zoho.
This tutorial will guide you through the process of setting up GoSMTP with your Zoho.
Installing & Configuration with Zoho
To begin, make sure you have installed and activated the GOSMTP plugin.
After verifying your license, you can easily configure the plugin's settings. Just Go to GOSMTP » Settings in your WordPress dashboard and navigate to the SMTP Settings tab.
After verifying your license, you can easily configure the plugin's settings. Just Go to GOSMTP » Settings in your WordPress dashboard and navigate to the SMTP Settings tab.

To get started, follow these steps to configure the GO SMTP plugin in WordPress:
Basic configuration

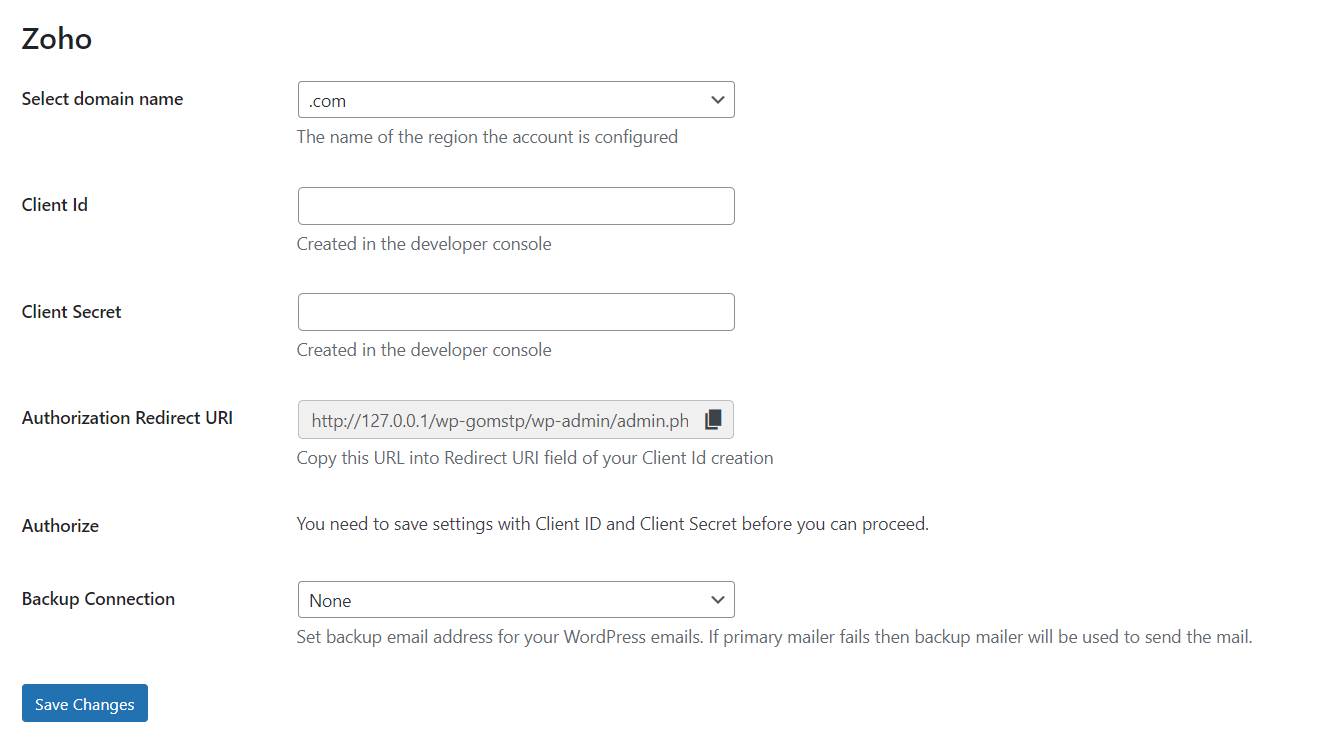
Once you select Zoho as your email provider in the GOSMTP plugin, you'll notice a new section called Zoho. In this section, you'll find settings labeled Client ID, Client Secret, Domain Name, and Authorization Redirect URI.
To simplify the process, focus on the Authorization Redirect URI. This is a specific URL that you need to copy.
To simplify the process, focus on the Authorization Redirect URI. This is a specific URL that you need to copy.
To obtain the required information for the Zoho fields (Client ID, Client Secret, and Domain Name), you'll need to create a Zoho Console using your Zoho account. Don't worry, no coding is involved, and I'll guide you through the process in the next step.
Obtaining Zoho API Credentials
Certainly! Here's an extended and simplified guide on obtaining Zoho API credentials and integrating them with GoSMTP:
Visit the Zoho Mail website (https://www.zoho.com/mail) and log in to your Zoho Mail account using your credentials.

Go to the Zoho Developer Console by visiting https://accounts.zoho.com/developerconsole in your web browser and click GET STARTED button.

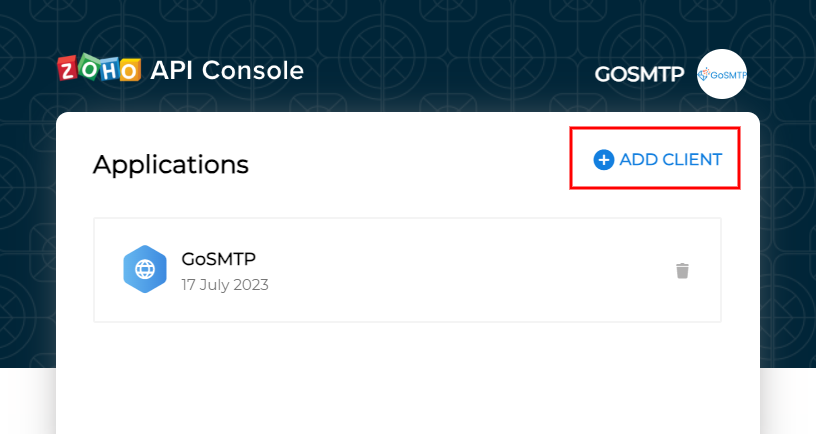
If you have already created a client in Zoho, you will see a list of clients in the Zoho Developer Console. To create a new project within the console, click on the "Add Client" button (or a similar option) to get started.
When you click on the "Add Client" button in the Zoho Developer Console, you will be presented with Zoho's Client Type options. To establish the connection for your project, choose the "Server-Based Applications" option. This selection is suitable for integrating your server or application with Zoho Mail.

When you select "Server-Based Applications" in the Zoho Developer Console, you will see a list of settings that require your input:
Client Name: Enter a distinctive name for your application. This name can be anything you choose, typically the name of your website.
Homepage URL: Provide the URL of your website, such as "https://gosmtp.com". This helps Zoho recognize your website.
Authorized Redirect URIs: Copy the value from the Redirect URI field in the GoSMTP settings that you left open earlier. This ensures that Zoho can redirect authentication information back to your WordPress site.
Once you have provided the necessary details, click the "Create" or similar button to create the project. By completing these settings, you will establish the necessary connections between Zoho Mail and your website, allowing for improved email delivery.

After submitting the settings mentioned above, you will be directed to a page displaying your Client ID and Client Secret values. These credentials are essential for the integration process. Copy the Client ID and Client Secret as we will need to paste them into the GoSMTP Zoho settings later on.

Mailer configuration
In the GoSMTP settings, enter the Client ID and Client Secret that you obtained from the Zoho Developer Console.

To determine the region of your Zoho account, you can follow these steps:
1) Log in to your Zoho account on the Zoho website (www.zoho.com).
2) After logging in, locate your account settings or profile information. You can usually find this by clicking on your profile picture or avatar in the top-right corner of the screen.
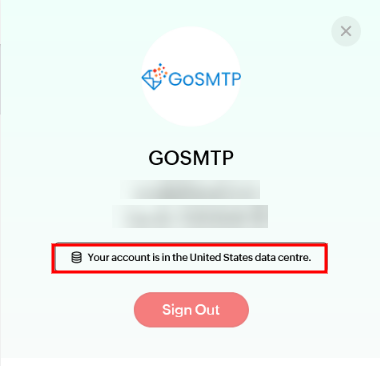
3) In your account settings or profile information, look for the region or data center location associated with your Zoho account. It may be explicitly mentioned or indicated by a two-letter country code such as US, EU, IN, CN, or AU.
4) Make note of the region or data center location for your Zoho account.
If you are unable to find the region information within your account settings or profile information, you can try reaching out to Zoho support for assistance. They should be able to provide you with the necessary information regarding the region or data center location of your Zoho account.
Please note that the steps may vary slightly depending on any updates or changes made to the Zoho user interface.
1) Log in to your Zoho account on the Zoho website (www.zoho.com).
2) After logging in, locate your account settings or profile information. You can usually find this by clicking on your profile picture or avatar in the top-right corner of the screen.
3) In your account settings or profile information, look for the region or data center location associated with your Zoho account. It may be explicitly mentioned or indicated by a two-letter country code such as US, EU, IN, CN, or AU.
4) Make note of the region or data center location for your Zoho account.
If you are unable to find the region information within your account settings or profile information, you can try reaching out to Zoho support for assistance. They should be able to provide you with the necessary information regarding the region or data center location of your Zoho account.
Please note that the steps may vary slightly depending on any updates or changes made to the Zoho user interface.
Specify the region of your Zoho Mail account by selecting the appropriate region code (e.g., US, EU, IN) from the dropdown menu and click Save Settings.

Once you save your settings, the page will refresh, and you'll see a "Authorized Zoho Account" button below the client secret. It is essential to grant permission before Zoho allows our plugin to use your Zoho API for sending emails.
To grant permission, simply scroll to the bottom of the GOSMTP settings page and click the "Authorized Zoho Account" button.

When you click the button, it will take you to a Zoho page where you will be prompted to connect your website to your Zoho account. In some cases, you may be asked to log in to your Zoho account if you haven't already.
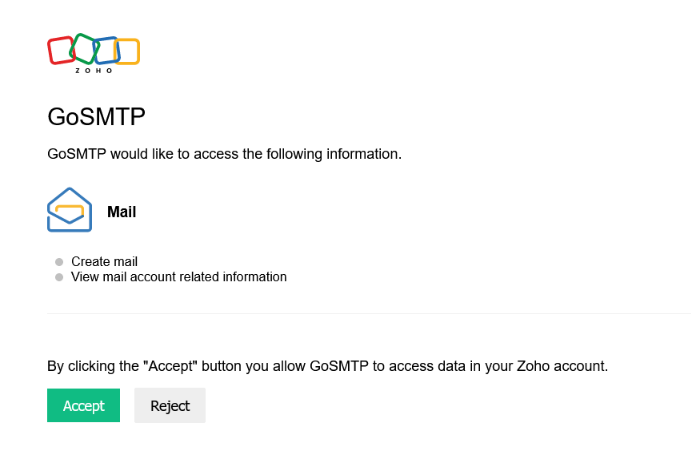
To proceed, simply click the "Accept" button on the Zoho page. This action confirms your consent to connect your site with your Zoho account and allows the integration to take place. By accepting, you enable the necessary communication and data exchange between your website and Zoho.
This step ensures a secure and authenticated connection between your site and Zoho, enabling the integration to function properly.
You will now receive a "Mail successfully configured" prompt, indicating that you can now use Zoho mailer for sending emails.

To deactivate your token in the future, just click on the "Deactivate Access Token" option on the screen below.

Send test Mail
After successfully configuring the mail settings, it's time to test your email functionality. Send a test email to verify whether it will be delivered successfully or encounter any issues. This test will determine whether your mail setup is functioning properly.
Freqently Asked Question
No, you only need to enter the Zoho API Client Secret and Client ID once in the GoSMTP settings. The plugin securely stores the credentials for future use.
No, the Zoho API Client Secret and Client ID are required to establish a secure connection between GoSMTP and your Zoho account. Without these credentials, GoSMTP cannot communicate with Zoho's API for email delivery.
Yes, GoSMTP takes measures to ensure the security of your Zoho API credentials. The plugin securely stores the credentials and uses them only for the intended purpose of connecting your WordPress site with your Zoho account.
Remember to keep your Zoho API Client Secret and Client ID confidential and avoid sharing them with unauthorized individuals.
If you have further questions or encounter any issues with the Zoho API credentials in GoSMTP, it's recommended to consult the GoSMTP documentation or reach out to their support for specific guidance and assistance.
While there are no specific limitations or restrictions associated with using Zoho Client Secret and Client ID, it is essential to comply with Zoho's terms of service and API usage policies. Familiarize yourself with Zoho's documentation and guidelines to ensure your usage aligns with their requirements.